Every once in a while, I get the urge to work with computers. I want to get my hands dirty, figuratively, and dig into the details of installation, configuration, and execution. This experimentation comes in handy when we discuss the trends in the enterprise. Typically, we neglect processes when we do small scale experiments, but that is matter for another time. Besides, it is really fun to play with new technologies and understand the direction these technologies are heading to.
My personal machine
I wanted to run virtual machines on my system, instead of messing with my own machine. Because I multiplex a lot, I want to have large enough server. That way, I can keep all the VM’s open instead of waiting for the VM’s to come up, when I need them.
Since my basic requirement is to have large amount of memory, I settled on Sabertooth X79 mobo. It can support 64GB, which is good enough to run at least 8 VM’s simultaneously. Someday, I can convert it to my private cloud instance, but till then, I can use it as my desktop machine with lot of personal VM’s running.
I have two 27” monitors ordered off ebay, directly from Korea. Each monitor, costing $320, offers 2560×1440 resolution, with stunning IPS display – it is the same as in Samsung Galaxy, but with large 27” diagonal size. These days, you can get them from even newegg.
To support these monitors, you need dual DVI – two of them. They do not support HDMI and VGA would negate all the benefits of such high resolution. The consumer grade reasonable one is built with GeForce GT 640, of which there are several.
Finally, I used pcpartpicker site (http://pcpartpicker.com/p/23MXv ) to put together all my parts and it showed if my build is compatible internally or not. Also, it helped me pick the stores where I can buy them from. I ended up ordering from newegg and Amazon, for most needs. I also had all other needed peripherals like Logitech mouse, webcam, and MS Keyboard etc. from before, which I used for my new computer.
Software
For software, I opted to use Windows 8.1, as I use office apps most of the time. I use ninite.com to install all my apps – they can install all the needed free apps. Here are some of the apps I installed using that app: Chrome, Firefox, VLC, Java, Windirstat, Glary, Classic Start, Python, Filezilla, Putty, Eclipse, Dropbox, Google Drive.
Since I needed to run VM’s on this machine, I had a choice of VMPlayer or Virtual Box. I opted for VMPlayer.
My cloud machine
While the personal machine is interesting, that was only to free up my existing 32GB machine. The cost of such a machine, with right components is less than $1000. As per software, I had the choice of using ESXi 5.5, Xenserver 6.2, or Microsoft hypervisor 2012 R2. All of them are free, which meets my budget.
I tried ESXi (VMWare VSphere hypervisor), which did not recognize my NIC on my mother board. I tried inserting the driver in the ISO from previous release, but even after recognizing the Realtek 8111 nic, it still did not work. [Xensever](http://www.xenserver.org/overview-xenserver-open-source- virtualization/download.html), on the other hand, worked perfectly well with first try. Since yesterday, I have been playing with Hadoop based Linux versions in this setup.
If you want to try
It is fairly cheap to have your own private setup to experiment. Here is what you can do:
- Get yourself a decent quad-core machine with 32 GB. You do not need dvd drive etc. Add couple of 3TB disks (the best is Seagate Barracuda, for the right price). If you can, get a separate NIC (Intel Pro 1000 is preferred, as it is best supported).
Here is one that is configured: http://pcpartpicker.com/p/34gg0 just to show how low you can go. For around $1K, you can even get one from http://www.avadirect.com/silent-pc-configurator.asp?PRID=27809 as well.
- Install Xenserver on the machine. It is nothing but a custom version of Linux, with Xen virtualization. You can login like any Linux machine as well. The basic interface, though, is a curses based interface to manage the network and other resources.

[Image courtesy: http://www.vmguru.nl/ – mine was 6.2 version and looks the same. From 6.2 version on, it is fully open source.]
-
On your laptop, install Xencenter, which is the client machine for it. Xencenter is full-fledged client, with lot whizbangs.
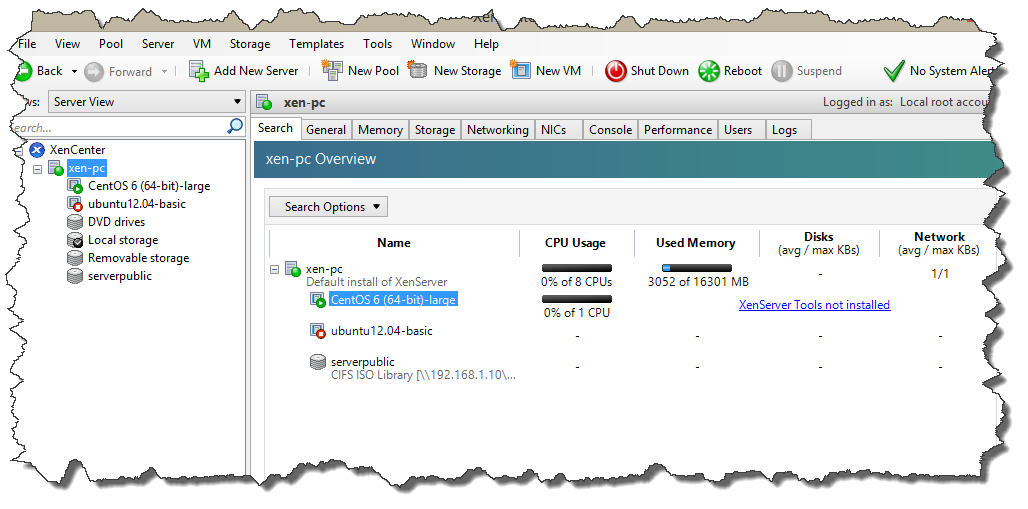 It has support to get to console for the machine and other monitoring help. We
can use the center to install machines (from a local ISO repo), convert from
VMDK to OVF format for importing etc.
It has support to get to console for the machine and other monitoring help. We
can use the center to install machines (from a local ISO repo), convert from
VMDK to OVF format for importing etc. -
It is best to create machines for it, as conversion is a little error prone. I created a custom Centos 6.4, 64bit machine. I used it as my minimal install.
-
When I installed it, the installation did not allow me to choose a full install. That is, it ended up installing only basic packages. I did the following to get a full install: 1. The console doesn’t seem to offer the right support for X. So, I wanted to have VNCserver with client running on my Windows box. 2. I installed all the needed RPM directly from the CD’s, using the following commands:
- I added the CDROM as a device for the YUM repo. All I needed were a few edits in the yum.repos.d folder.
- I mounted the CDROM on Linux (“mount /dev/xvdd /media/cdrom” : notice that the cdrom device is available as /dev/xvdd).
- I installed all the needed software, with one go: “yum -disablerepo=\* -enablerepo=c6-media groupinstall "Desktop" "Desktop Platform" "X Window System" "Fonts"”
3. I enabled network and assigned static IP. 6. I installed VNC server and customized to open for my display size of 2260×1440. 7. In the end, I removed the peripherals, and made the server headless, and stuck it in the closet. With wake-on-lan configured, I never need to visit the server physically.
At the end, you will have a standard machine to play with, a set of minimal installs for me to experiment with on your XenCenter.
What you can do with it
Now, you do not have a full private data center. For instance, you don’t have machines to migrate the VM’s to, setup complex networking among the machines, and connect storage to compute servers. For even with this, you can do the following activities:
- Setup a sample Hadoop cluster to experiment: It is easy enough to start with Apache Hadoop distribution itself so that you can understand the nitty gritty details. There are simple tasks to test out the Hadoop clusters.
- Setup a performance test center for different NoSQL databases. And, do the performance tests. Of course, performance measurements under VM’s cannot be trusted as valid, but at least you will gain expertise in the area.
- Setup a machine to experiment with docker
At least, I am going to do these tasks for the rest of the week, before I head out on the road.